10 Steps of Attic Capping
Originally posted on https://tapinsulation.com/10-steps-of-attic-capping/
Want to learn the common 10 steps of attic capping with TAP® Pest Control Insulation? Let’s begin with a background of our product.
BACKGROUND INSIGHT
Since 2001, Pest Control Insulation, makers of EPA-registered TAP® Pest Control Insulation, have been supporting pest management professionals (PMPs) nationwide in servicing their customers’ homes with three unique benefits:
- A permanent layer of pest protection from common household insects.
- A more robust thermal envelope helping customers save money on their annual energy costs, and
- A quieter home environment free from external noise pollution.
In the majority of homes across the U.S., TAP® Pest Control Insulation is installed in an attic cap presentation. This is when the product is installed directly on top of the attic’s existing insulation to complete the thermal envelope and provide a layer of permanent pest protection.
Step by Step Process to Set Expectations
Here are the 10 steps of attic capping with TAP® Pest Control Insulation:
1. A complete and thorough inspection of your attic will be conducted. During the inspection, the technician will determine the type, amount, and condition of your existing insulation as well as any evidence of pest intrusion. The technician will recommend an attic cap if there are no signs of pests and the attic is below the recommended U.S. Department of Energy’s (DOE) recommended levels for your region of the country. An attic cap brings your current insulation into the DOE’s recommended range.
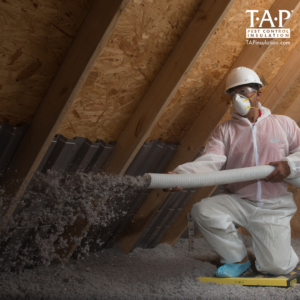
2. The PMP will begin setting up their equipment such as insulation blowers, hoses, insulation materials, and supplies in your driveway or yard. The insulation blower should never be used indoors to protect your home from damage.
3. The insulation blower’s hose will be snaked through your garage, front door, or windows to gain the most direct access to your home’s attic entry. Drop cloths will be incorporated to protect your floors, windows, walls, and doors from damage during the installation.
4. The attic’s ventilation will be protected, if necessary, by the installation of baffles or air vents which are attached along the eaves. This allows your attic to continue to breathe and prevent moisture build-up which can cause conditions optimal for mold or mildew.
5. A three-inch barrier will be created around any heat-producing devices (i.e., recessed lights, chimneys, flues, attic fans) to prevent the insulation from coming in contact with them. This is a national requirement regardless of the type of insulation installed.
6. Attic rulers will be installed across the attic to provide the PMP a visual guide as to how much TAP® Pest Control Insulation is to be installed. The amount installed is set during the original agreement. These will remain in place following the installation to help you and any future inspectors to see the amount of insulation installed. It also helps to easily calculate the existing r-value.
7. TAP® Pest Control Insulation will then be installed in your attic to the level agreed upon. This helps increase the home’s thermal barrier and adds that layer of permanent pest protection.
8. An attic card/warranty is then stapled inside the attic close to the attic’s entry point. A second copy is handed to you as the homeowner. The attic card outlines the job including the number of inches installed, the type of insulation installed, and the r-value achieved. The warranty is a lifetime warranty. It is also transferrable should you sell your home.
9. The PMP will then clean up all equipment and supplies restoring your home to its original state. This is a great time to ask any final questions you might have.
10. The entire process can take up to 6 hours depending on the size and complexity of the attic space.
And there you have the 10 steps of attic capping.
Final Thoughts
Remember, asking your PMP to install an attic cap featuring TAP® Pest Control Insulation in your home provides you with a confidence that you are making the best energy efficient decision to protect your home, your family’s health, and your wallet. Life in comfort, live pest-free with TAP® Pest Control Insulation.
Learn more about this innovative pest control product or contact us to locate a provider of TAP® Pest Control Insulation in your area.