What is 3D Interior Rendering? How to do it right?
Originally posted on https://www.lightfeeltraining.com/post/what-is-3d-rendering
What Is 3D Interior Rendering?
In the simplest terms, 3D rendering is the creation of models in a 3-dimensional space. It is essentially a computer-generated object that can be viewed within a digital environment.
Over the recent years, 3D rendering has become common or even the standard in the interior design industry.
And if you’re an interior designer, you already know how important it is to give your clients the best visual representation of a product before you start work.
For decades, the industry has used scale models and 2D sketches to give clients an idea of what the finished product will look like. These are fine, but there’s a lot of room for mistranslation.
If only there was a way to actually walk in the space before the work even starts…
Enter 3D rendering.
Here are the topics we’ll cover in this guide to 3D interior rendering:
-
How is 3D interior rendering used?
-
How to make a great 3D interior rendering?
-
Why should you care about 3D interior rendering?
How Is 3D Interior Rendering Used?
3D rendering is changing the way that interior designers and architects represent future projects. These renderings are created using sophisticated computer software which accurately simulates real-world textures, lightings, and physics.
And we’re not talking about 3D models that look like they’re out of a video game.
We’re talking about renderings that look like the real thing.
Unlike 2D drawings, 3D renderings allow you to view the space from any angle. And unlike models, they allow the viewer to tour the space at scale…
…Especially if you combine your 3D renderings with virtual reality technology. With VR, you can take a tour of the space that feels like you’re literally there!
This makes 3D rendering the best way to represent projects while they’re still in the concept phase.
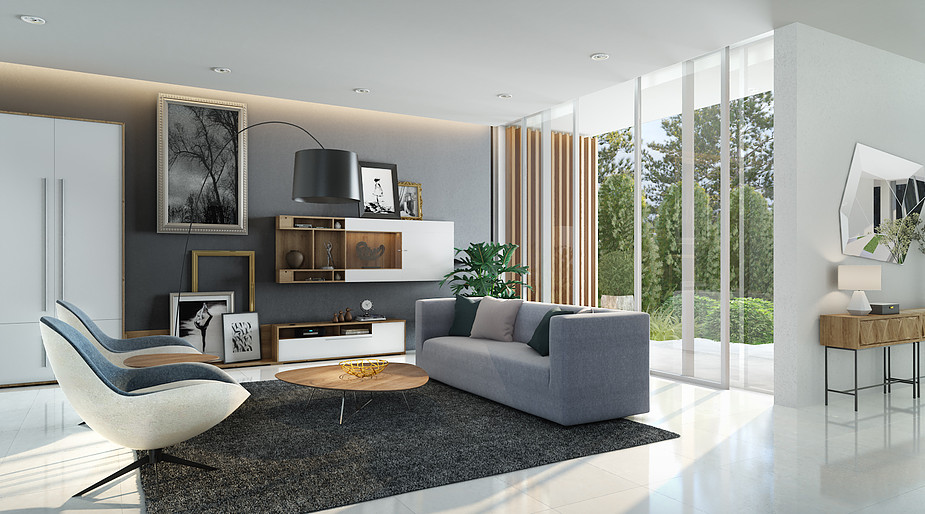
How to Make a Great 3D Interior Rendering?
Creating a lifelike 3D rendering isn’t a simple process. Getting a good end result requires four main steps.
3D Modelling
The first step of any 3D render is modelling.
 © Lightfeel Training
Here, you essentially sculpt the image. The 3D model is created and manipulated using computer software like 3DStudio Max, Sketchup or Rhinoceros 3D. It’s very similar to building a physical model, only in a digital space.
This is where you build the actual structure but the models are shown as a RAW wireframe scene. A room’s structure is made up of many straight and simple shapes. So, you can modelling the structure easily in any 3D software.
However, task will get complicated if you want to add furniture and appliances. Some might find it hard and time-consuming to learn how to model those furnitures especially the exotic one.
Luckily, there are many online resources such as Design Connected, Free 3D, Turbosquid, Dimensiva, etc. at your fingertips that provide tons of high-quality furniture assets to help save your time.
Any errors in modelling will carry through to the rest of the steps. Make sure that your dimensions are accurate, or else you might end up with an off-scale model, which will undermine its realism.
Texture
You might not think much about texture when you look at the world around you. But when it comes to rendering, high-quality materials such as floors, walls, and ceilings play an important role in a beautiful render.
 © Lightfeel Training
Now you have a simple RAW model. It might give a good idea of how space would look in the real world, but it will look cheap and unrefined—sort of like a video game from the early 2000s. Even if you add colour, it will look like a cheap 3D animation.
Therefore, these RAW models need to be refined by assigning them the textures. And most rendering programs allow you to assign textures to different parts of your model.
You may tempt to find the textures from Google or some random websites. However, low-quality textures will make your work unappealing, especially if your objects and surfaces are seen up close.
You need to pick textures that are so realistic, you can easily imagine how it would feel, and even make some adjustments to them.
Gloss, reflectivity and roughness are the criteria you may need to consider when choosing the right materials. This is especially critical if you have wood, metal and stone in your scene.
Use natural material colours that are not too saturated or too close to black.
As a rule of thumb, keep most of the red, green, and blue values on surfaces roughly between 0.2 and 0.8 (when represented on a 0 to 1 scale). This will allow the surfaces respond consistently and accurately to the light source.
Websites like textures.com, texturer.com, flyingarchitecture.com are useful resources where you can download some premium textures. Of course, if you want to get the best rendering textures your ultimate goal is to learn how to develop them yourself.
Choosing the right textures is one of the best ways you can take a flat looking model and turn it into a photorealistic render.
Don’t forget those little details, like adding the landscape visible through your windows!
Lighting
Even after you’ve assigned textures to your model, your design might still look a little fake. In order to make it as realistic as possible, you need to add light.
 © Lightfeel Training
This is more than just turning on a virtual lamp and casting some shadows. If the single light source you’re using is lamps, you’re not doing it right. There are various light sources and reflectors like the sun, tables, white walls, fidget spinners, etc.
You need to think about how lighting might be used in a real-life setting.
Throughout the day, lights and shadows “move” and you have to mimic these changes by using different parameters and settings. By testing each light setting, you can see how it affects the scene and the objects.
Luckily, you may not have to do this all by yourself.
There are a number of powerful lighting plugins, such as V-ray,Maxwell Render, Corona Renderer e.t.c., that will do the heavy lifting for you. Using these lighting plugins, you can create true-life-like light effects such as Area lights, Dome lights, Spotlights, Ambient light, Point light, etc.
However, you should choose the right light sources wisely because different lights behave differently and it will affect the realism of your shadows.
For example, Area lights emit light from surfaces, either rectangular or circle. It creates shadows with soft edges like it shine through a real-world window.
Spotlights cast very direct source of light and create sharper shadows. A common use for a spot light is to create three point lighting, which utilizes three spot lights to create a unique mood in your scene.
Of course, feel free to play with these light controls to figure out which ones could work in a specific scene.
Post-Production
Once you’ve created your lifelike scene in a rendering program, it still might not look completely finished.
 © Lightfeel Training
Often, you’ll want to run images of your design through a photo editing software like Photoshop. After all, most photographers run their images of the real world through some basic retouching. Giving your digital world the same treatment is a great way to look like you snapped a photo of it yourself.
And considering that some lighting engines take a while to process, Photoshop has its own native lighting effects that you might be able to use instead.
Why Should You Care About 3D Interior Rendering ?
If your question has shifted from “what is 3D rendering?” to “why should I care?” consider this.
According to information from the Bureau of Labor Statistics, the expected growth rate for interior designer jobs between now and 2026 is 4%. Compared to the average growth rate for all occupations of 7%, the slower growth rate means the increasing competition for interior design jobs.
For this reason, being able to work with 3D software has become a valuable skills for many employers and it will improve your marketability in the job market.
Are you ready to take this advantage? Check out this Autodesk 3ds Max Fundamental Course to start learning 3D rendering now!