The Total Guide to TV Lift Cabinets
Photo from Wildwood TV Lift Furniture
Originally Posted On: https://www.wildwoodtvliftfurniture.com/the-total-guide-to-tv-lift-cabinets/
Introduction
The first home TV set hit the commercial market in 1934. Since then we have seen incredible technological growth. TVs have not only become bigger and thinner, they have also become smarter and much more affordable. Along with these advancements in TVs themselves, we have also seen a huge increase in the number of things to watch and the quality of the viewing experience with the onset of streaming. These amazing advancements have lead to the normalization of having a TV in almost any room in the house. We have all grown accustomed to seeing massive TVs mounted in prominent areas through out the house. The is great when we are in the mood to watch our favorite shows, but when you really think about it, it is a bit of a shame that the focal point of so many of our rooms is a huge screen.
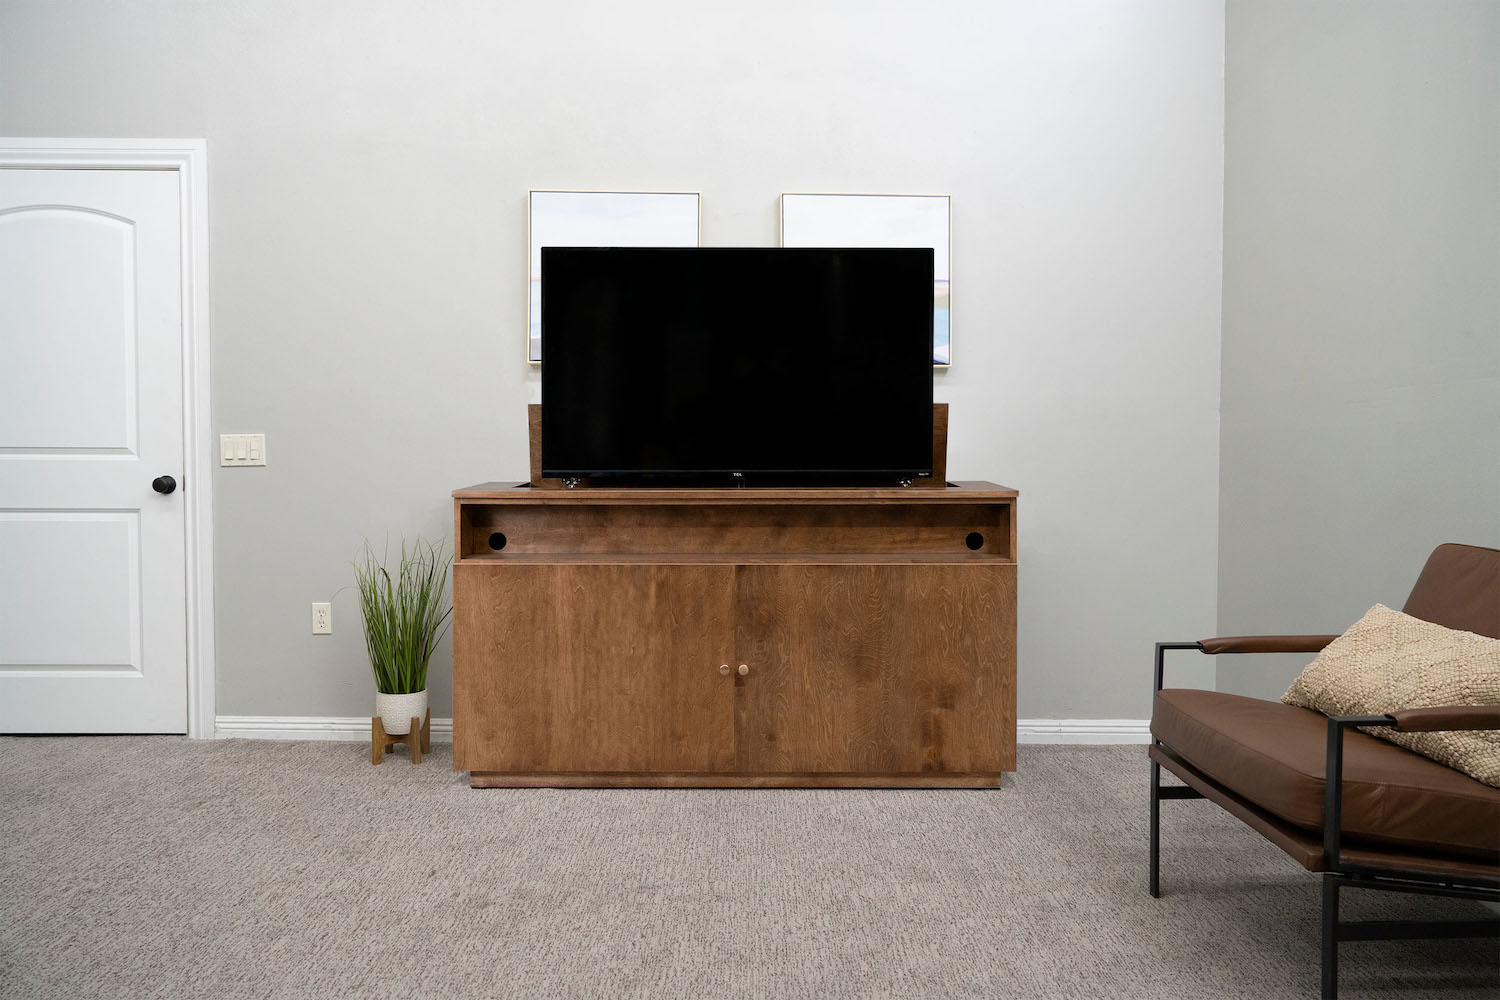
TV lift cabinets allow us to get a much needed break from screens, without sacrificing our access to TVs. These cabinets come in many shapes and sizes, but the overall concept is the same. It is a piece of furniture which hides a TV that can easily be exposed at any time to watch a show, then hidden back in the cabinet. A TV lift cabinet is a great solution for so many different rooms and needs. This article is a total guide to TV lift cabinets, answering many common questions, and teaching you everything you need to know to be ready choose the right TV lift cabinet for you.
Types of TV Lift Cabinets
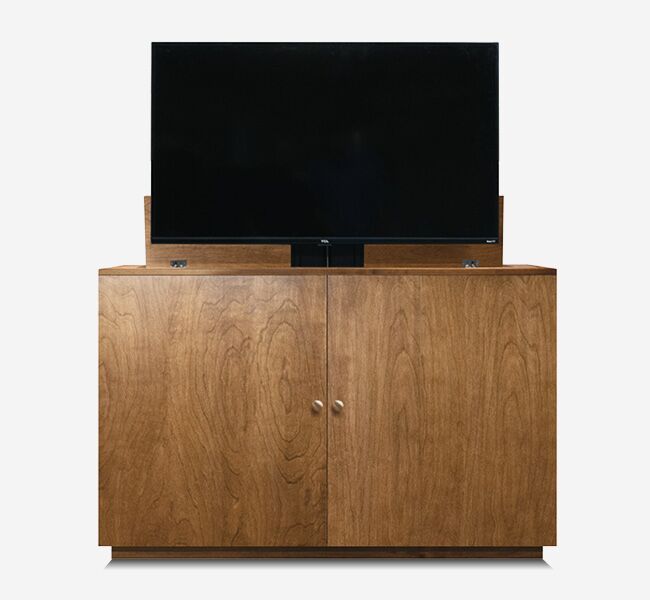
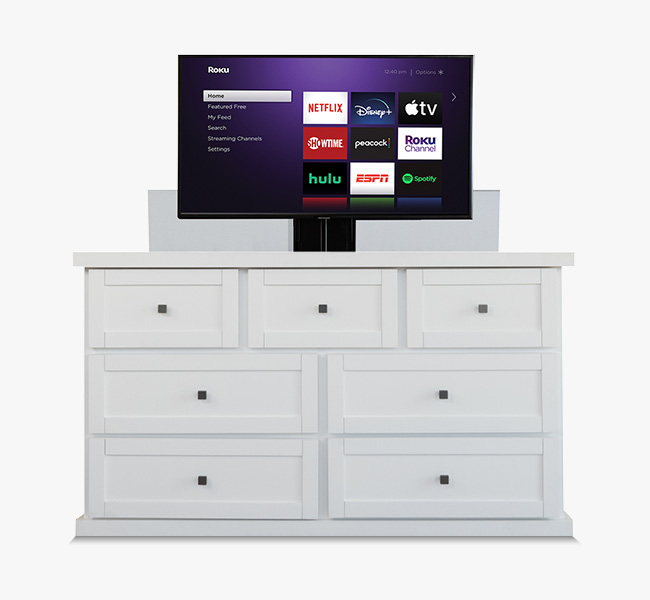
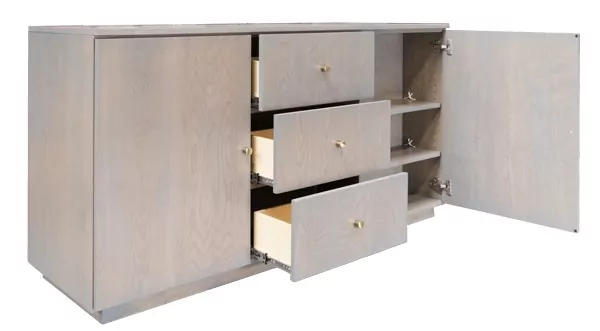
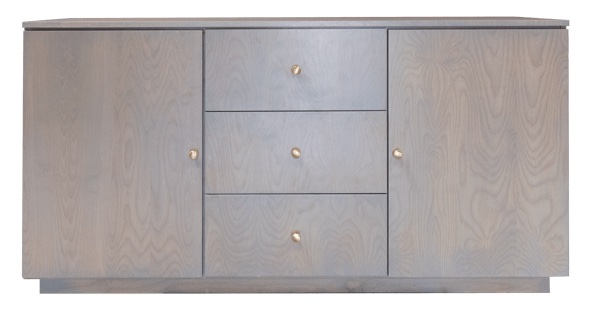
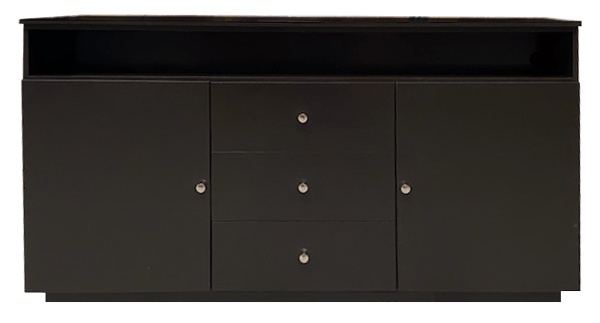
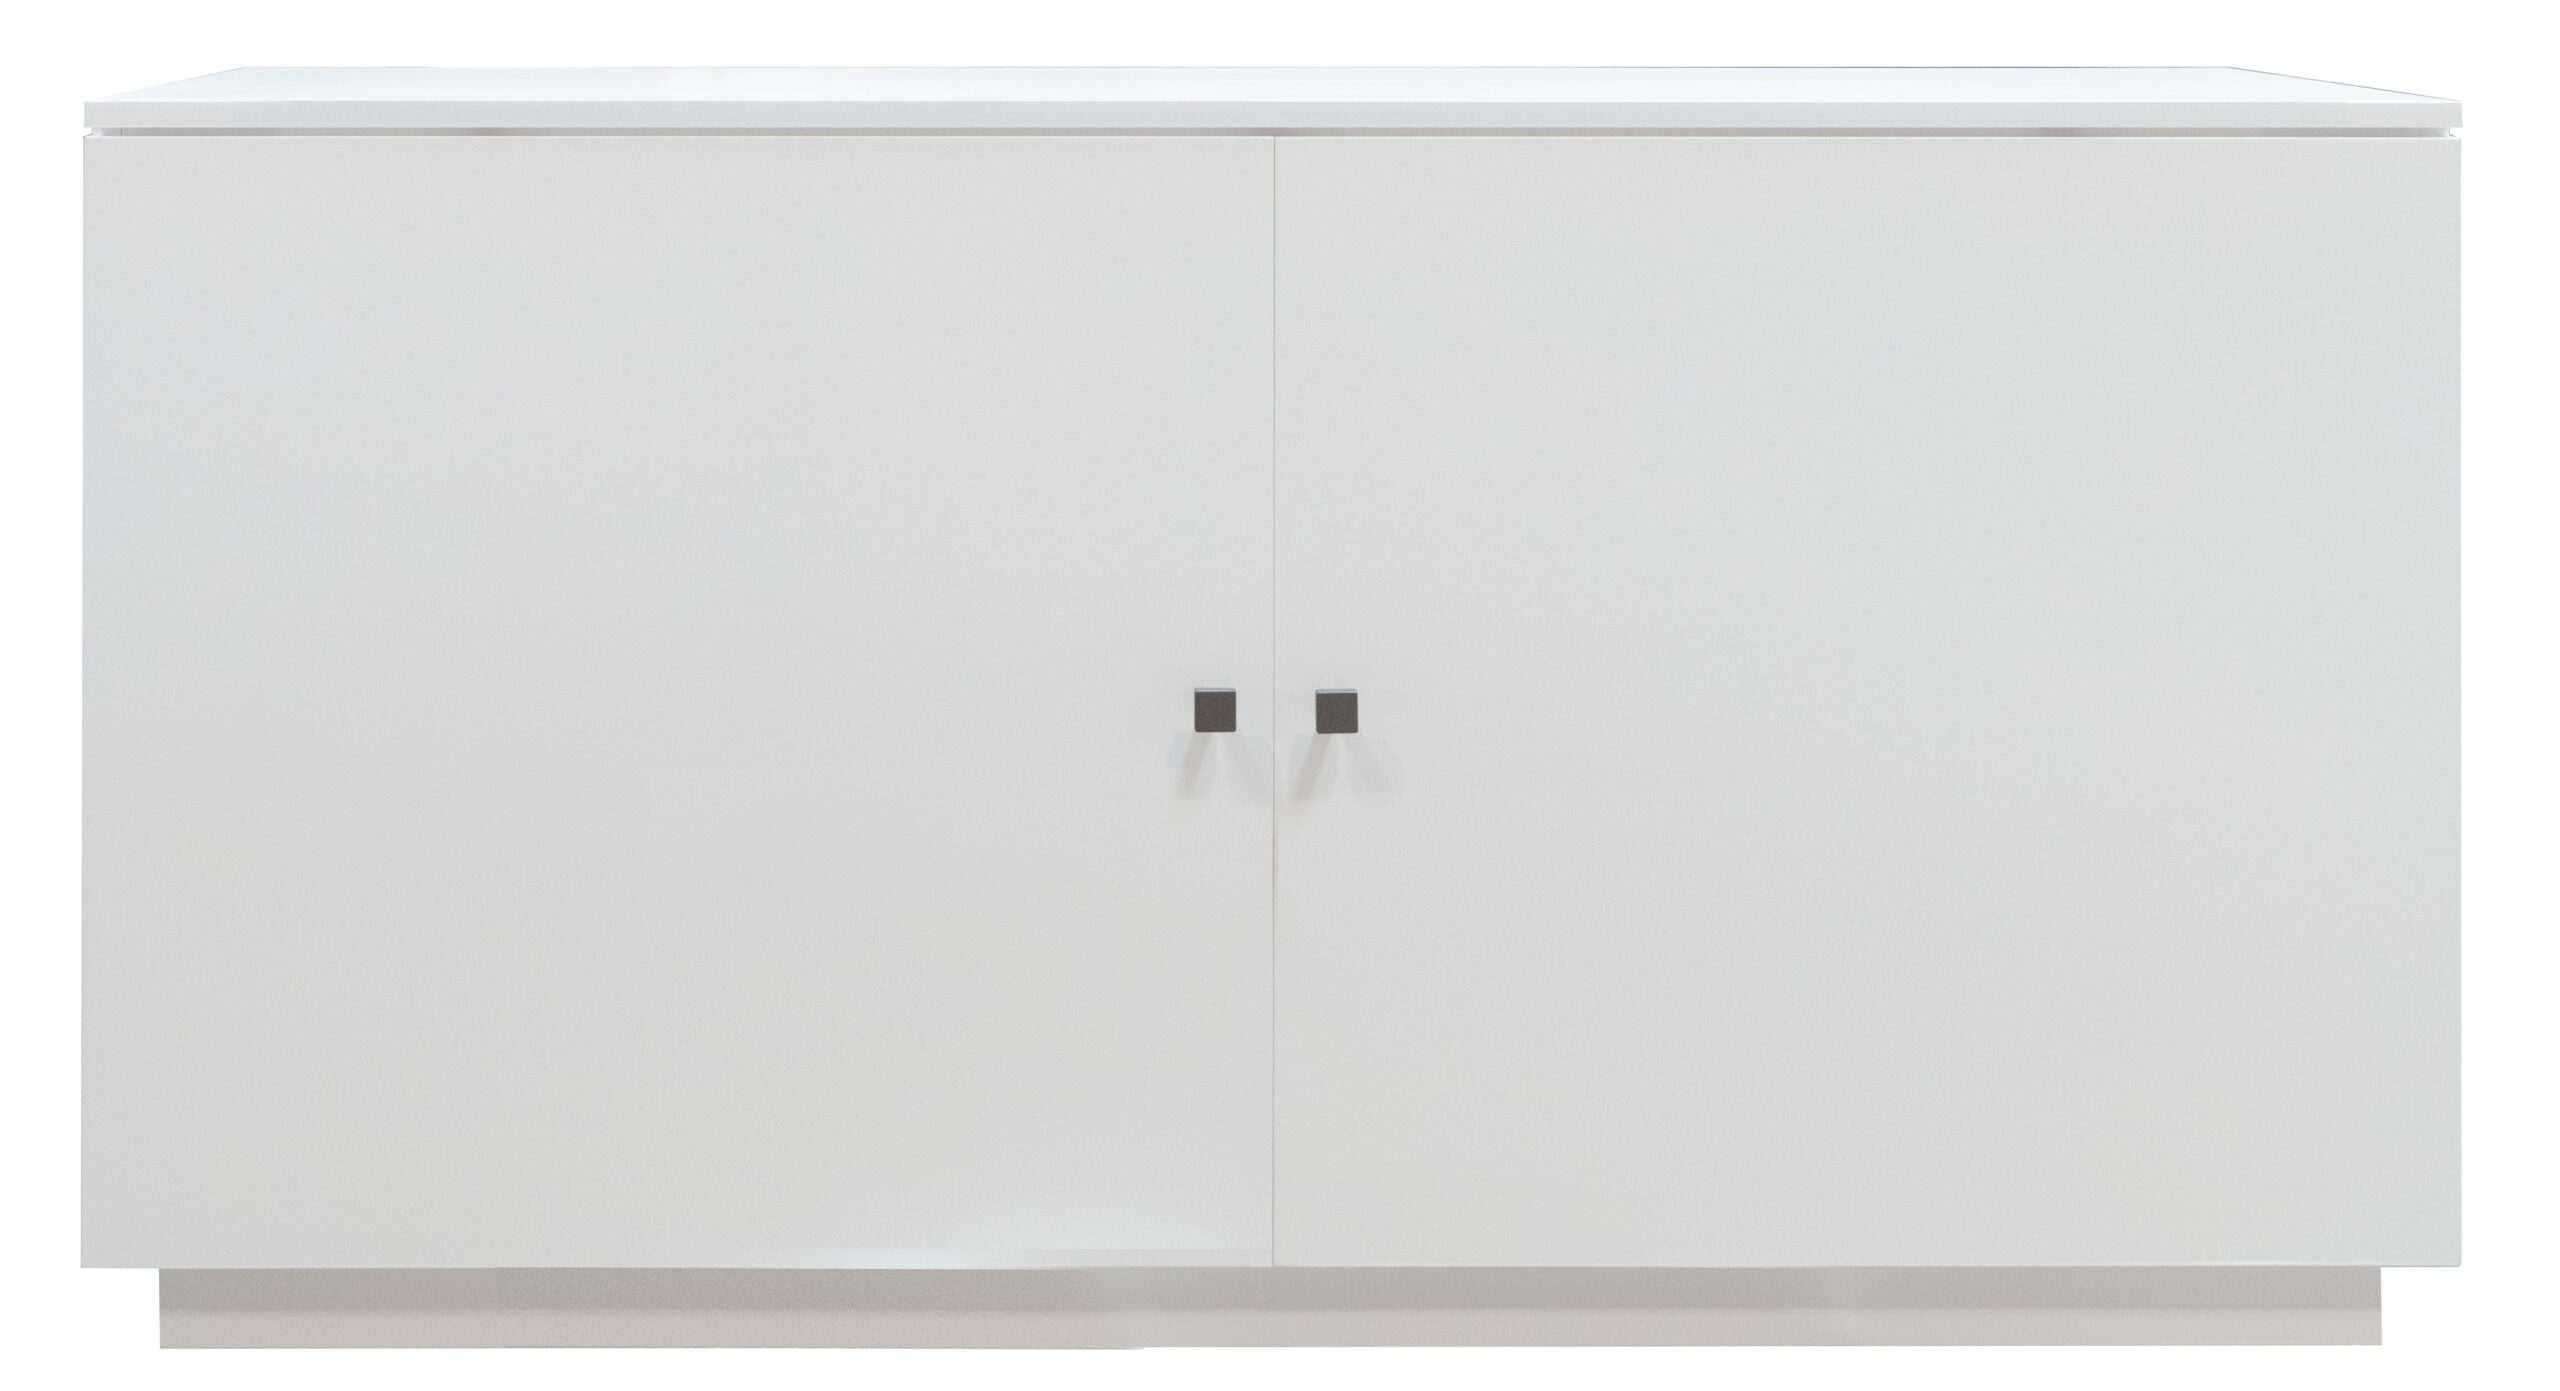
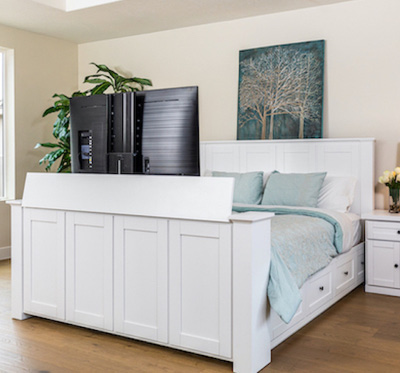
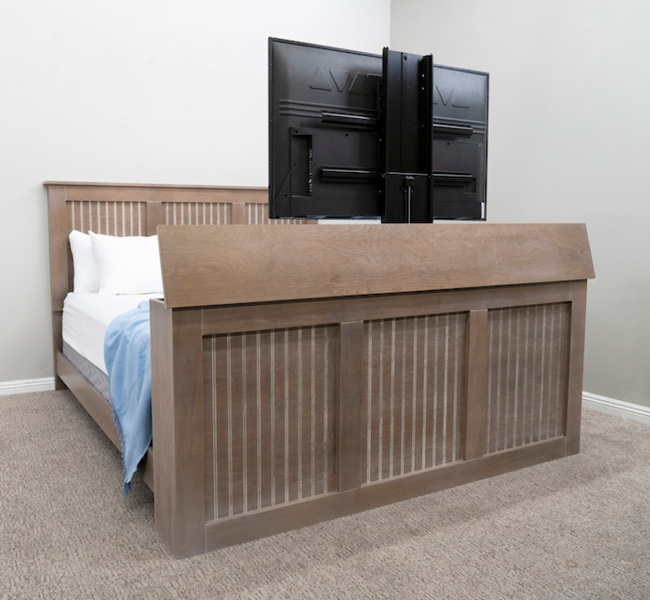
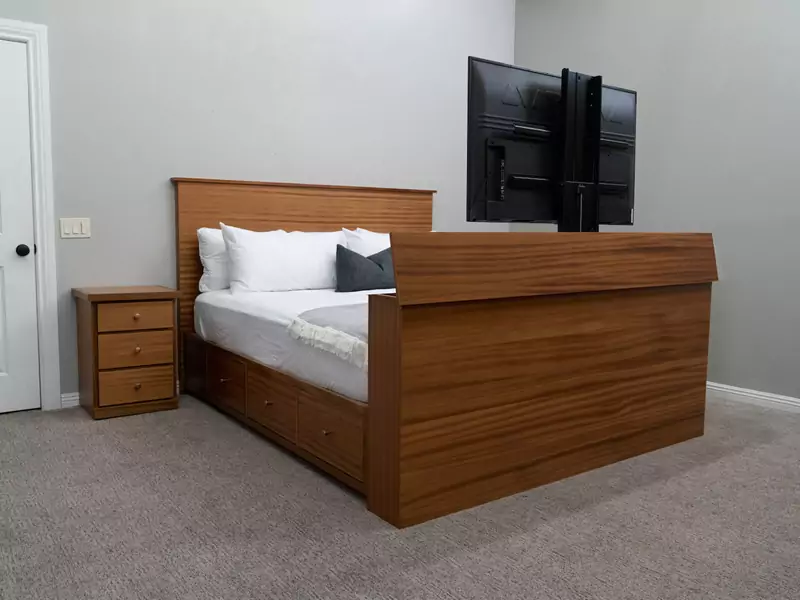
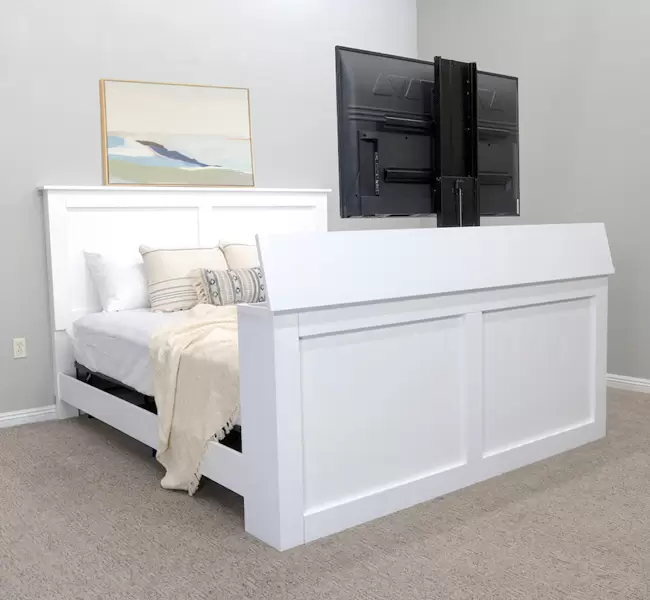
TV lift furniture comes in many different shapes and sizes. We list them in two different categories on our site: TV lift beds and TV lift cabinets. A TV lift bed is a unique blend of a traditional bed set with an entertainment center. These beds include a headboard, rails, bed supports, and a footboard with a TV lift mechanism build inside. This allows you to leave your bedroom open and free of screens, then with the simple click of a button your tv emerges from inside your footboard. TV lift beds are available in Twin, Twin XL, Full, Full XL, Queen, California King, and Standard King sizes. We offer them in multiple styles including modern, transitional, traditional, rustic, and much more. As with all of our furniture you get to pick the finish allowing you to design something perfect for your space and motif. The TV lift cabinets on our website can also designed to be standalone cabinets that can be in any room and any space. The cabinets can include faux doors, functioning doors, drawers, display space, as well as the TV lifting mechanism.
Four Types of TV Lift Cabinets
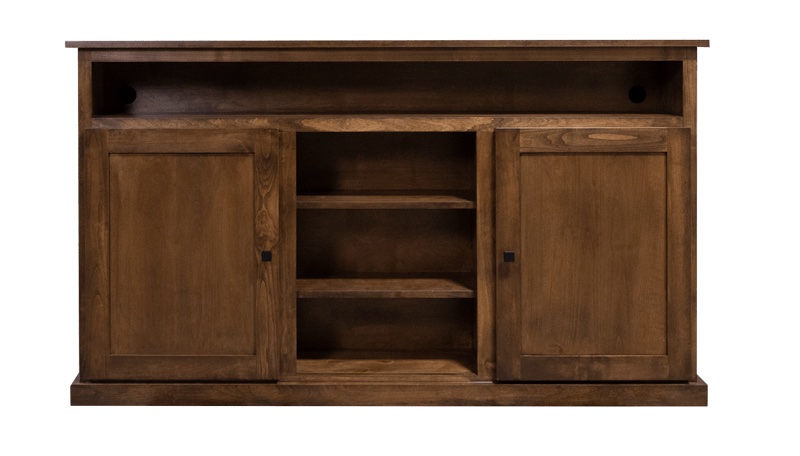
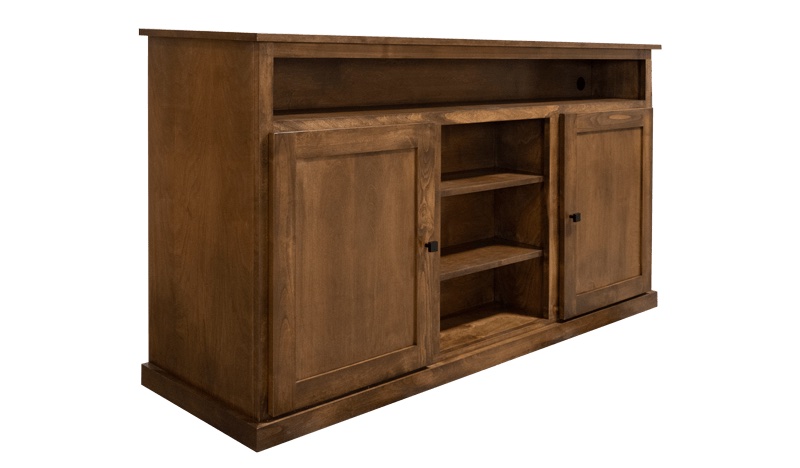
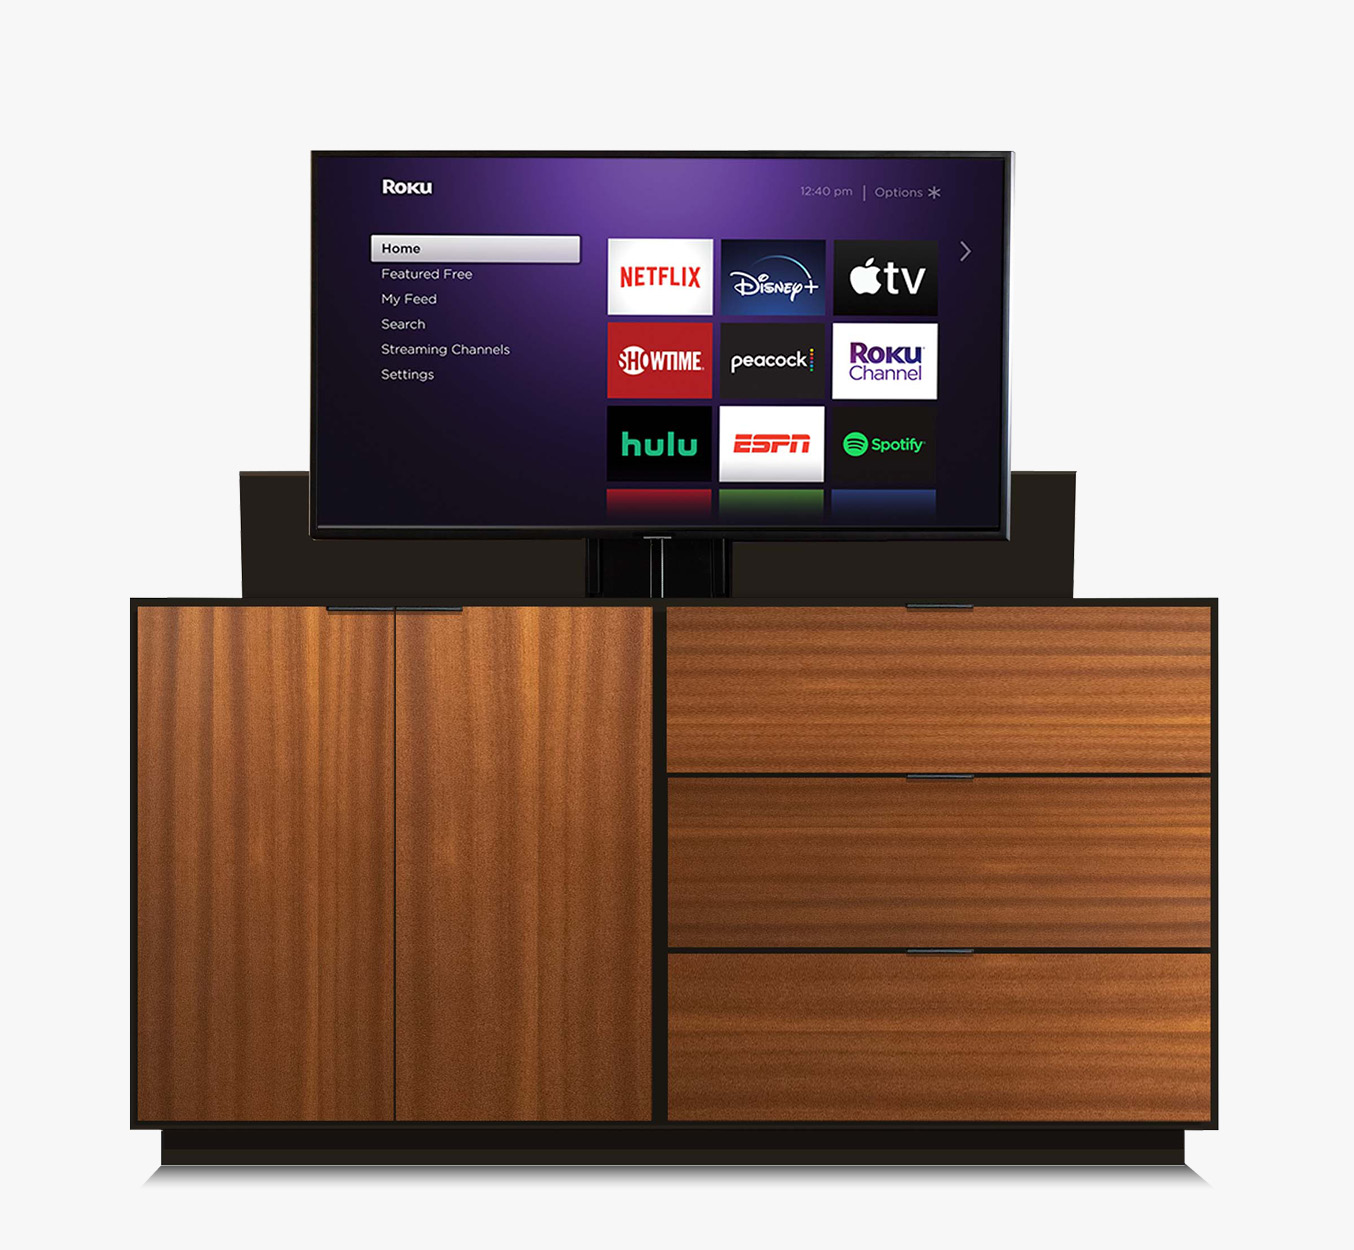
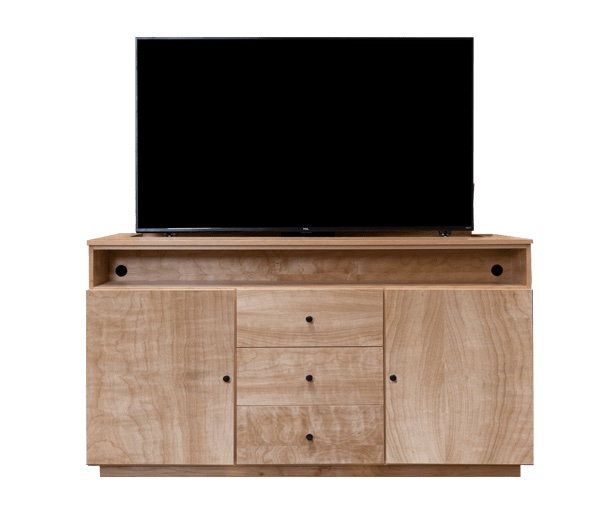
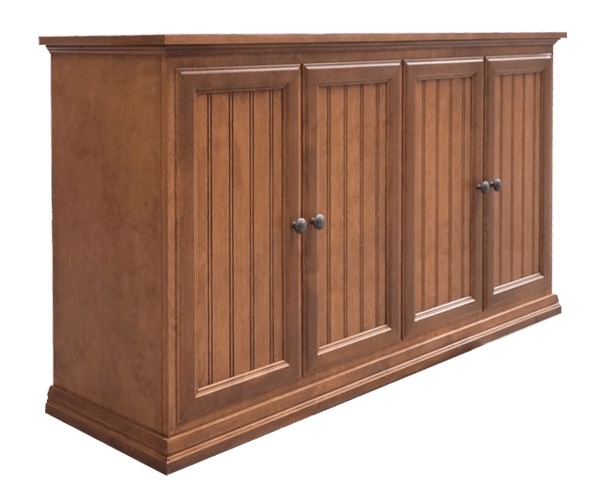
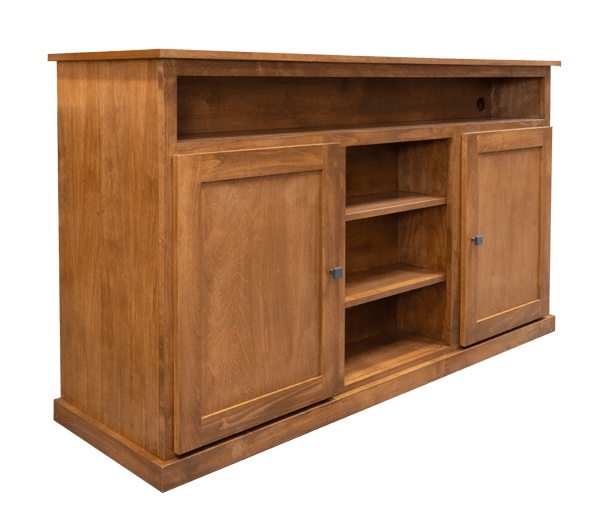
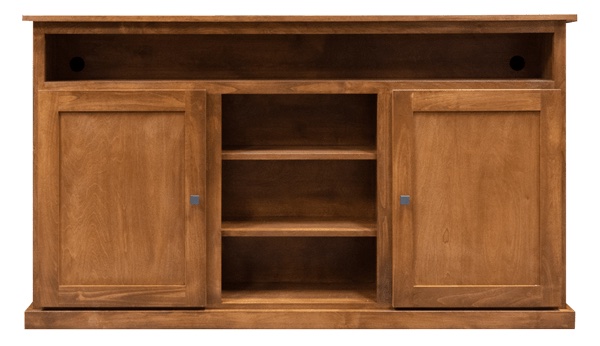
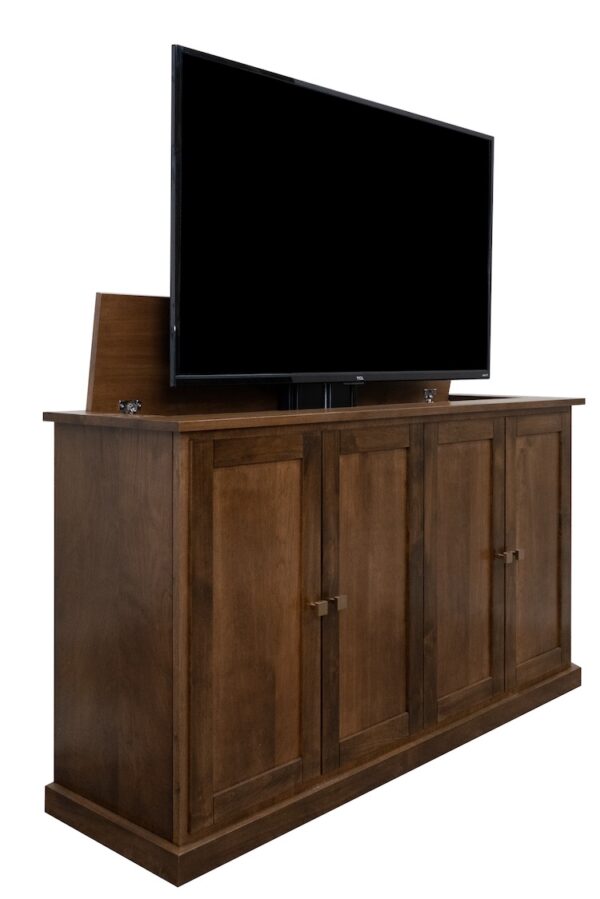
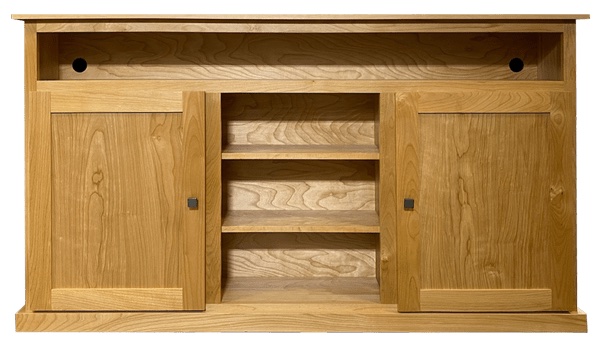
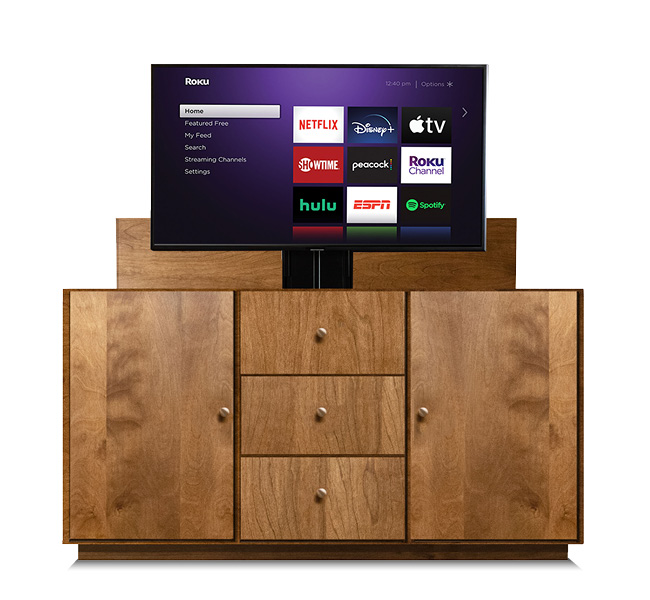
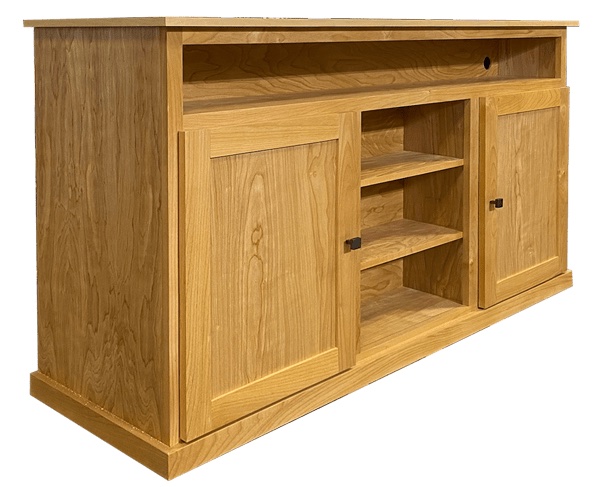
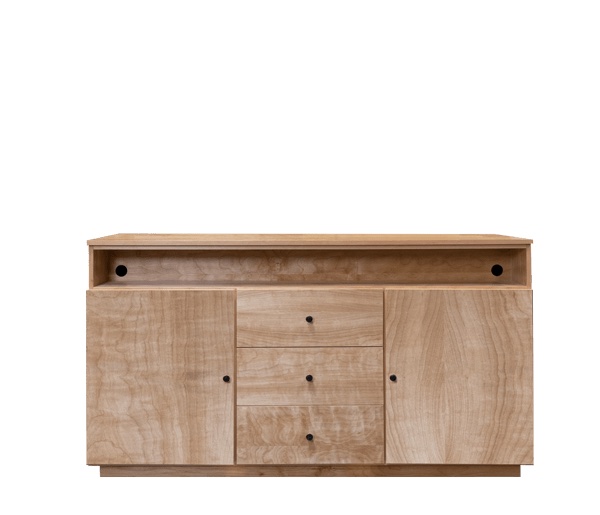
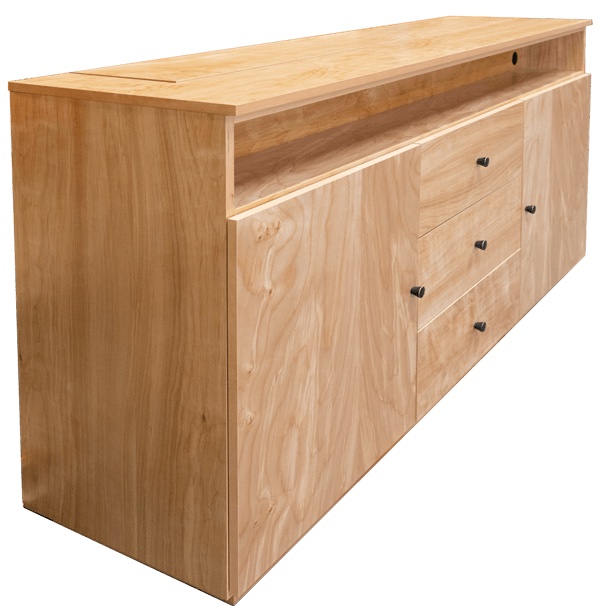
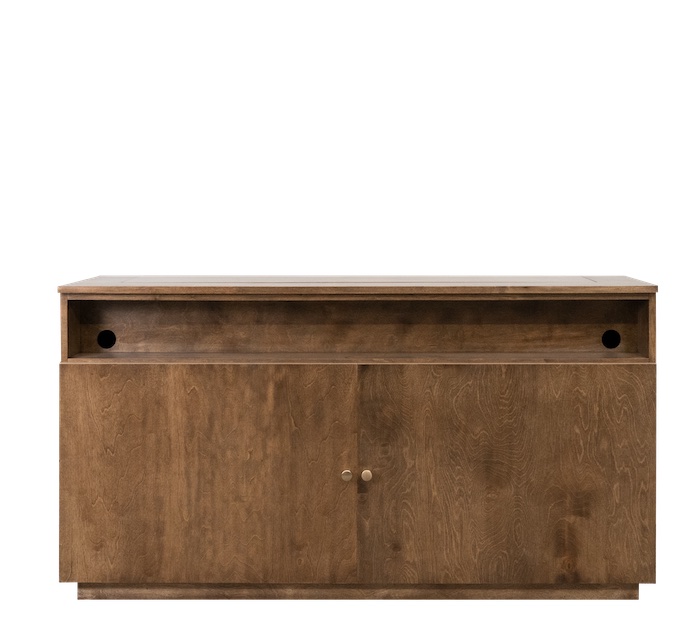
There are 4 different types of TV lift cabinets offered by Wildwood TV Lift Furniture. The first is the Basic TV Lift Cabinet. This option includes decorative trim on the face of the cabinet designed to look like doors. It is the most space conscious option we have and fits up to a 55” TV. The second type of TV lift cabinet is called the Basic Plus TV Lift Cabinet. This one also uses the decorative trim, but the cabinet is larger to accommodate up to a 60” TV. The third type is called the Storage TV Lift Cabinet. This is where you start to get more function out of the cabinet because is includes functioning doors, shelves, and in some styles even drawers. There are various styles so the layout of this cabinet will depend on the style you choose but the overall purpose is the same. This is a functioning storage cabinet that also hides up to a 60” TV. The final type of cabinet is called the TV Lift Media Console. This option has everything you need. It includes the same shelves, doors, and drawers as the Storage cabinet, but it also includes the sound bar cubby which is a great place to storage any devices you want, or to display your favorite knickknacks. The TV Lift Media Console is large enough to fit up to a 65”, creating the ultimate TV watching experience.


Freestanding TV Lift Cabinets
A common question with any of our TV lift cabinets is if they can be freestanding. Our TV lift cabinets all come with wall mounting anti-tip hardware to keep the cabinets from tipping over in case of misuse or an earthquake. That being said, we do have the option of making the cabinet a little bit deeper, giving it adequate stability, and fully finishing the back of the cabinet. This process allows it to be freestanding in the room. So, if you don’t want the cabinet to sit against a wall just let us know us and we will make it perfect for your home.
Why Should I Get a TV Lift Cabinet?
There are many reasons to get a TV lift cabinet. The reason often depends on the room that it would be going in. A TV lift cabinet in the bedroom is often a great compromise when one spouse wants a TV and the other doesn’t. It hides the TV from view and is only out when they want to watch something. It is also really common in bedrooms that are odd shaped or in rooms where there simply isn’t a good place to hang a TV or put a TV cabinet.
Another common room for a TV lift cabinet is the living room. Using a TV lift cabinet is a great way to keep the TV from being the centerpiece of the room, allowing the living room to be open, clutter free, and centered on your décor rather than a screen. It is also a popular solution when the TV would be going in front of a window blocking your view of the outside. A TV lift cabinet is also a clever way to limit your screen time, with the TV out of sight it is often out of mind as well.
The guest room is another popular place for a TV lift cabinet. It is a room that when guests come they may want to watch a show, but you don’t need to have the TV out and exposed all of the time. A TV lift cabinet lets you keep your guest room looking nice without a TV taking up wall space, and becoming the focal point.
TV lift cabinets are a convenient way for us to get rid of screens. We have all grown accustomed to TVs being a center point of our rooms, but they don’t need to be. With a TV lift cabinet, you can still enjoy your favorite movies and shows, keep the same high quality viewing experience of a big screen with a sound system, but not have to look at your TV 24/7. These cabinets help open up your room, get more function out of an awkwardly shaped space, and hide the clutter of wiring and screens. You don’t have to choose between design and entertainment.
What materials are TV lift cabinets made of?
At Wildwood TV Lift Furniture quality is always at the forefront of our minds. Quality furniture always starts with quality materials. To us this really comes in to play with the woods that we use. All of our furniture is made exclusively out of solid wood and furniture grade plywood. We don’t use any laminates, melamine, or particle board. Everything is made entirely out of real wood.
Furniture Grade Plywood
Furniture grade plywood is a specially designed seven band plywood that we use for the structure of our cabinets. The top and bottom layers are solid wood decorative veneers. The next layers in are thin layers of medium-density fiberboard. This layer ensures that there are no knots, imperfections, or air bubbles beneath the veneer layers. The center 3 layers are strips of American white woods with the grains going in alternate directions to create a stable core. This ply structure was specifically designed for use in high-end furniture. It allows for large panels of wood to be stable without risk of bowing and warping. Solid wood is wood in its most natural state. It is simply strips of wood milled directly from trees. It is used on all of our trims and decorative panels.
There are many reasons to use these natural materials rather than faux woods. Real wood is much stronger, more durable, and easier to repair than the popular plastic substitutes. Real wood also brings a lot of character that isn’t found in the alternative materials. Because wood is a natural material every piece has its own unique grain patterns, tones, and characteristics. There is a warmth and beauty to real wood that cannot be replicated by a substitute. We build our TV lift cabinets entirely out of real wood not only because of the strength and beauty, but also because of the rich history of wooden furniture. We are carpenters and we take great pride in building furniture the traditional way rather than the easy way. At Wildwood TV Lift Furniture we merry traditional materials and classic wood joinery with the precision and function of cutting-edge technology.
Sustainability
We understand that we make our living from the forests. Using sustainable sourced materials is of the utmost importance to us. We get all of our woods from North American groves that are planted specifically to be used as lumber. When a tree is cut down it is replaced with a newly planted tree. We also donate regularly to fund the planting of trees by the U.S. National Forest Service to sustain our beautiful national forests.
The Woods We Use
As for the types of woods that we use in building our TV lift cabinets, Alder, Oak, and Mahogany are our three standard woods. We also have access to Cherry, Maple, and many more special-order woods. Each wood species has its own unique graining and characteristics.

Natural Oak Wood
Oak wood
Oak wood has a long history of being used for furniture. It has an open cell grain, with lots of variation. It is very dense and in turn extremely durable. Other common uses include hardwood flooring, and in barrels used to ferment liquors. Oak is easily stained and is currently popular in a lot of the washed finishes.

Natural Alder Wood
Alder wood
Alder wood is also a common wood used in furniture manufacturing, as well as the wood that Fender Guitars builds their electric guitar bodies out of. Alder is a closed cell grain, with little texture, but lots of personality. The grain is smoother than oak wood and the color tends to be more consistent. One of the main benefits of alder wood is that it can easily be stained to look like so many other woods.

Natural Mahogany Wood
Mahogany wood
Mahogany wood is commonly found in fine furniture. It is also one of the most desired woods for string and percussion musical instruments. Mahogany has an open cell grain, but unlike oak the grain is linear and consistent making it a popular choice for modern and contemporary TV lift cabinets.
TV Lift Mechanisms
We couldn’t write an exhaustive guide to TV lift cabinets without spending considerable time on the TV lift mechanism. The mechanism is the heart and soul of the TV lift cabinet and it makes or breaks the experience of using the TV lift cabinet. TV lift mechanisms also introduce tolerances and restrictions to the TV lift cabinet. For example, the maximum/minimum height dimensions and the maximum/minimum depth dimensions of the TV lift cabinet are determined by the mechanism and its capabilities.
Types of mechanisms
When it comes to mechanisms, there are many available on the market. However, every mechanism fits neatly into one of two categories: swiveling or non-swiveling. This is a major distinction that is fairly intuitive–swiveling mechanisms will allow for the TV to swivel left and right while non-swiveling mechanisms are stationary. Neither mechanism is inherently better than the other, they simply address different needs and uses.
Swiveling mechanisms
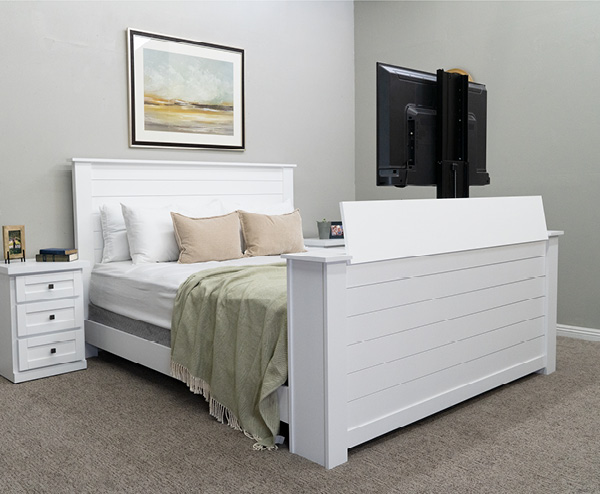
Swiveling TV lift mechanisms can be a great way to enhance the functionality of your room. Typically, swiveling mechanisms are used in situations where the TV lift cabinet (or TV lift footboard, as is commonly the case) needs to be visible from multiple angles in a room or home. For example, many people have small sitting areas in their bedroom opposite from their bed, in this case a TV lift footboard could provide a great viewing angle from both the bed and the sitting area if the TV lift mechanism could swivel 180º to face both areas (See example 1 below). Similarly, many people use TV lift cabinets as a partial divide between two adjacent rooms (See example 2 below).

There are a variety of different mechanisms that fit into the “swiveling” category, but they all have one goal: to expand the area in which the TV can be seen. Some of the varieties to know are full swivel vs. partial swivel and manual swivel vs. power swivel. Let’s dive into these various subcategories to determine what route is best.
Full Swivel vs. Partial Swivel
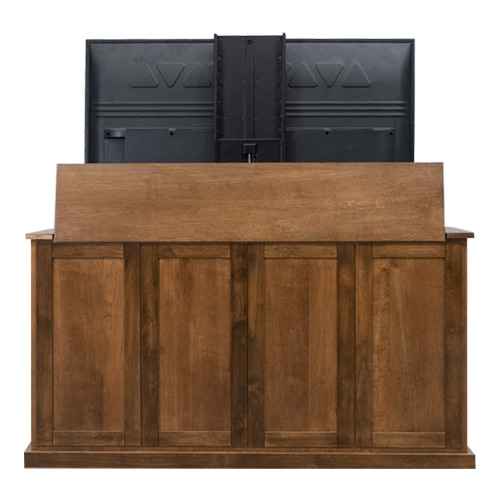
This may seem obvious, but it is more nuanced than you might think! Full swivel mechanisms can turn 360º to face any part of the room. They are typically the most expensive TV lift mechanisms, and they require the top (or lid) of the TV lift cabinet to remain attached to the mechanism as it raises and lowers. Typically, this is seen in the form of what we refer to as a “hat” top. A hat top is simply when the lid stays flat above the TV as it rises out of the body of the lift cabinet.
Partial swivel mechanisms are mechanisms that do not rotate a full 180º to face the opposite direction. While the full-swivel mechanisms are most useful when they are freestanding in the middle of a room, partially swiveling mechanisms are best when they are against a wall. If your cabinet is going against a wall, swiveling 180º is unnecessary. Partially swiveling mechanisms are more expensive than stationary mechanisms, but they are typically considerably less costly than full-swivel mechanisms.
Manual Swiveling vs. Power Swiveling
Manual swiveling mechanisms are swiveling TV lift mechanisms that rotate by physically pushing or pulling the TV in the direction you want it to go. Have you ever adjusted the angle on a wall-mount TV? You just grab the corner of the TV and turn it to face the best angle; this is how manual swiveling mechanisms are built. The benefits of these mechanisms are (1) they are less costly, (2) they are less prone to problems, and (3) they are less bulky. The downside is that you have to walk across the room and physically move the TV to face the desired position.
Power swiveling is where the mechanism has an additional motor that rotates the TV for you. While this is a nice feature (especially if you are looking for the “gee-whiz” effect of a TV lift), in most cases the benefits don’t outweigh the downsides. Firstly, a 360º power swiveling mechanism is the most costly mechanism on the market. The powered swivel adds additional motors, actuators, electronic/sensor functions, etc. So the price tag is steep. Secondly, these mechanisms have a lot of moving parts that can break or go out. Finally, the additional functionality results in additional hardware that makes these mechanisms big, heavy, and bulky, requiring deeper TV lift cabinets.
TV Lift Cabinet Safety Features
Any decent swiveling TV lift mechanism has built-in safety features designed not to allow your mechanism to do any damage to itself, its cabinet, the TV, or you while it is in normal use. The danger in swiveling mechanisms is that, without safety features, the mechanism could start to lower into the cabinet while it is still partially turned. If this were to happen, the TV would collide with the TV lift cabinet, damaging the cabinet, the TV, and possibly the mechanism. The two safety features to know about are designed to avoid this.
The first safety feature is standard on most TV lift mechanisms, we refer to it as the “reverse pressure cut-off” feature. Essentially, if the mechanism starts to feel any resistance as it is lowering into the cabinet, it will automatically cut off power (and in some cases go back up a few inches). This way, if it bumps into anything, be it the cabinet, a pillow, a hand, etc., it stops and allows you to clear the path.
The second safety feature is more specific to swiveling mechanisms. It essentially cuts off power to the mechanism when the TV is in the non-standard position. When the TV is facing the standard direction the power is restored and the TV lift mechanism can operate normally again. When the mechanism is turned to the right or left (even by a few degrees) it cuts power. This is often done using magnets on the swiveling portion of the mechanism with the stationary body of the mechanism. Once that magnetic connection is broken, the circuit is broken and power is cut.
Common TV Lift Mechanism Measurements and Dimensions
When shopping for a TV lift mechanism, you’ll find a few standard dimensions that are provided. Usually you will find these details in spec sheets (which are usually readily available), and they are typically measured in millimeters. The dimensions to know are: minimum height, width, depth, travel distance, lifting weight capacity and lowering weight capacity.
- Minimum height: Minimum height is the smallest vertical space the TV lift mechanism can occupy. This is the total height of the mechanism–without a TV–when it is fully stowed.
- Width: This is typically the full width of the mechanism, measured without a TV. The widest part of a TV lift mechanism is usually the horizontal mounting brackets, so this is usually the point that is measured.
- Depth: This dimension is much more important than you might think. The minimum inside dimension of a TV lift cabinet is computed by combining the depth of the TV with the depth of the mechanism and adding a little wiggle room. Therefore, the depth of the TV lift cabinet or TV lift footboard will be drastically changed by a change in the depth of the mechanism.
- Travel Distance: The travel distance of a TV lift mechanism is how high the mechanism can raise at full capacity. This is measured by comparing the minimum height (see above) with the height of the top of the mechanism when it is fully raised.
- Lifting Weight Capacity: This is the amount of weight the TV lift mechanism can lift. This tells you how heavy your TV can be. Most mechanisms hold over 100 lb., and most TVs weigh less than 50 lb., so usually this is not a constraint.
- Lowering Weight Capacity: This is the amount of weight a TV lift mechanism can lower when the mechanism is inverted and lowering a TV out of, say, the ceiling. It’s important to note that this capacity is usually a fraction of the lifting weight capacity.
Pre-set heights
Usually the TV lift mechanism’s travel distance is longer than necessary to fully expose the TV. This certainly isn’t a bad thing! Worse would be the mechanism running out of track before the TV was all the way out of the cabinet. Because of this, most manufacturers have created systems whereby an artificial stop can be placed at the maximum required height. Why add a stop? For a couple of reasons. The main one is aesthetics. Many people don’t like seeing the “guts” of the mechanism exposed. They want to see just the TV screen and nothing else. However, in some instances, the TV lift mechanism would raise the TV high enough to collide into the bottom of a low ceiling or cabinet. A pre-set height, or artificial stop, is extremely handy in this situation so you don’t have to worry about damaging your TV.
Judging Mechanism Specs
Judging the quality of any product comes down to understanding the criteria that are important for the product to successfully perform its function. TV lift mechanisms are measured on a set of unique specs that will allow you to successfully compare any mechanism side-by-side. It’s important to also cross-reference these criteria with your preferences, for example, if the amount of noise the mechanism makes is important to you, pay extra attention to that criteria.
- Time to Raise: This is the amount of time it takes the mechanism to raise fully from stowed to fully raised. The quickest mechanisms can raise in 15-20 seconds while the slowest are more like 40 seconds. Manufacturers often measure this with and without a load, meaning it’s measured fully loaded with weight and its measured totally unburdened.
- Sound Output: Most people want TV lift mechanisms to be perfectly quiet. However, with any electric motor there will be some noise output. Typically sound output is measured in decibels. For example, a manufacturer may say that the mechanism puts out 60 db. This means that the TV lift mechanism is roughly as loud as a sewing machine. Pro tip: You can find all kinds of reference points to compare a mechanism to with a quick internet search of “decibel chart”.
- All of the dimensions and measurements listed above.
Now that you speak the language of TV lift mechanisms, it will be easy to rate and compare different mechanisms!
Raising vs. Lowering Mechanisms
While 99% of TV lift mechanisms will be used to lift a TV up from within a cabinet, there are instances where builders use these same mechanisms to lower a TV down from the ceiling, a cabinet, etc. This is certainly a valid option, but please be careful and consult with the manufacturer! Many mechanisms on the market today are not designed to support a load while inverted, meaning the mechanism is more prone to break in this position. TV lift mechanism manufacturers will generally disclose whether or not their mechanism should be used inverted, and what the weight restriction is while the mechanism is inverted. Typically, the weight restriction of a standard, upright TV lift mechanism is >100 lb. while it can be as little as 20 lb. when inverted.
Size Requirements and Tolerances
Many years ago when we built our very first TV lift cabinet we really had no idea what we were doing. We were just building custom cabinetry on the side for family and friends to make a little extra spending money. When one of our most loyal clients requested a TV lift cabinet, we started digging and discovered this world of TV lift furniture. However, our foray into this world was certainly not without initial missteps.
The first thing we did was sourced a TV lift mechanism. Because we didn’t know any better, we found a very inexpensive TV lift mechanism and started designing a cabinet around it. We were shocked when the mechanism came in to find that it required an 8” deep space to operate in. This means that, after adding a TV, the compartment that housed the TV and the mechanism was a whopping 13” deep! Once we added a sound bar cubby and some storage on the front of the cabinet, we were very disappointed with how bulky the cabinet turned out.
This is a very common pitfall that first-time TV lift cabinet builders fall into. They don’t realize that the TV lift mechanism comes with a set of cabinet size requirements that dictate how large or small the final cabinet size can be. So, be sure to check with the manufacturer’s spec sheet to find the minimum cabinet size requirements before purchasing your mechanism. Then, base your designs on those minimum requirements and see if the resulting TV lift cabinet will be acceptable
TV Size Restrictions
One very important consideration in sourcing a TV lift cabinet or TV lift mechanism is the TV size restriction. TV lift furniture sizes are usually defined by the size of TV they can hold. For example, at Wildwood TV Lift Furniture, we have several TV lift cabinet sizes, the Basic, the Basic Plus, the Storage, and the Media Console. Each of these sizes are defined first and foremost by their TV size capacity. If you aren’t sure what size your TV is, remember that the official size of the TV is the diagonal measurement of the screen. Below is also a handy guide that can help you determine which size your TV is.
Finding the Right TV for your TV Lift Cabinet
|
Size
(and diagonal screen measurement) |
Height | Width |
| 32” | 15.7” | 28” |
| 40” | 19.6” | 35” |
| 43” | 21” | 37.5” |
| 50” | 24.5” | 43.5” |
| 55” | 27” | 48” |
| 60” | 29.5” | 52.25” |
| 65” | 32” | 56.75” |
| 70” | 34.3” | 61” |
| 75” | 37” | 65.5” |
| 80” | 39.25” | 68” |
How to Hang a TV On a TV Lift Cabinet (Or TV Bed)
Hanging a TV on the mechanism in your TV lift cabinet or TV bed is typically a very simple endeavor. While we have not tested every single TV lift mechanism on the market, we have experience with quite a few and they usually follow the same basic pattern. Usually, there is some combination of brackets–some that mount to the mechanism and some that mount to the TV–that mount to each other. It’s very similar to hanging a TV on a wall mount.
Take a look at the video below to see an example of hanging a TV on one of our TV Beds.
TV Lift Cabinet Photo Gallery

–VIDEO TRANSCRIPT–
I’m going to go through some general ideas on mounting the tv to the mechanism. Now, tvs all vary in in how they mount and such, but we’re going to give you some some different pointers and some different ways to do this that should make this doable the newer tvs and especially from the big manufacturers all use what’s called a vesa pattern–which is–which means where the connections are on the back of the television for mounting it to a wall or mounting it to this mechanism. This vesa pattern is 200 by 200 (that’s 200 millimeters by 200 millimeters) and that’s what this one is. And, essentially they’re about eight inches apart from each other and as long as the back your tv has that vesa pattern where they’re they’re about eight inches apart, or 200 millimeters then then it might mount directly to the mechanism as-is, and I’m going to go through that very first. If it doesn’t, then there’s some other things that we’re going to go through so you’ll so we’ll be able to get it mounted to this mechanism.
The quickest and easiest way to mount it to the mechanism is if it can mount directly to these holes that are on the on the on the lift. These are the same vesa pattern, but tvs all vary as far as how high or low they mount so what I’m going to do is hold this tv up and see where it mounts–where I could get to some of those holes and come down just a little bit right… there.
Okay now if you can line up the tv into both of the holes, the upper holes and the lower holes, and the tv is no more than one half inch above the mechanism, you can mount it directly to this lift of the mechanism. This one we can’t because the lower hole is below this section. We’re not going to be able to do that, so we’re going to now show you how to mount it with a set of holes that’s kind of lower like this tv has.
Okay, now I’m going to show the lift brackets and the tv mounts and all of that; as far as getting this so it’ll mount to that the lift. First off, I wanted to point out that there’s a couple of lift brackets. This lift bracket is ultimately going to be installed into this lifting column now the thing to know is in order to make any of the tvs–any 50 inch tv–work, you are only going to use the third hole down, the fourth hole down, or the fifth hole down. So, just those three holes are the only options, and this will be the top bar. We’ll put one in the bottom too as soon as we get it all situated but we want to get it we want to get it gauged by this.
So, the third hole, fourth hole, or fifth hole. And I’m going to make reference to that here in just a minute as I’m putting the bracket on the back of the tv. Okay, now after having discussed mounting the lift bracket to the mechanism itself, that and where that’s mounted in that third, fourth, or fifth hole is going to interact with how this tv mounting bracket will mount to the back of the tv. And you’ll notice that there’s a series of holes and slots and you can use any spot because even with a washer you can use one of the bigger areas to mount these brackets to the back of the television. The goal is to make the tv as high on the mechanism as possible and still allow the lid to close. And the tvs are really… we’re really maximizing the space that we have in that footboard to make this work. So I’m just going to take this TV bracket and I’m going to find a couple of holes that I know I can mount into. If you can find a hole, a series of holes, that will allow you to [either make the bracket flush] with the top of the tv, up to an inch and a half down, then in that scenario–flush to an inch and a half down–you’re going to ultimately put the bracket on on the third hole. And we’ll do that here in a minute. If you can’t get it flush to an inch and a half down, meaning the holes on the tv are further down than that, then the next series, the next opportunity, would be this bracket.
From the top of the tv would be one and one half inches down, to three and a half inches down–so one and a half to three and a half–and then we’re going to use the fourth hole on that bracket. Now, if you still can’t get it into the into that parameter, then the next [position] would be: from the top of the tv to the top of this lift bracket would be three and a half inches to five and a half inches. That would put the bracket clear at the bottom of the tv, but that would then mean you’re going to use the fifth hole up there.
Okay, so what I’m going to do is I’m going to take this bracket and I’m going to line it up on the very bottom hole, and I’m going to measure. That puts me at two and three quarters, which means that I’m in that second area (which was an inch and a half to three and a half). So, I’m going to use the fourth hole up there. So that would be the first opportunity.
Okay, back to the mounting hardware that came in the bag in the mechanism box. There’s a series of lengths and also diameters. This particular TV is going to take the smaller diameter and I want this mounting bracket to be mounted as close to the surface of the back on this TV as possible. So, what I found is in this particular situation; the smaller machine screw works just great. So, I’m just going to go ahead and thread that down and it’s going to tighten down. They also give you some spacers and some washers and we’re going to use a washer here in a minute. If you need to use a spacer, it would be better to use that spacer more as a washer than as a spacer on the front of this bracket. We don’t want the tv to be too far from the front of this mounting bracket or else it’ll be too close to the face of the… or to the inside front of the… the footboard.
All right, so now my second hole up here that I’m going to put in it’s one of these slotted holes and it’s actually one of the larger areas of those slotted holes so I’m going to just use a washer and I’ll just go ahead and mount that in.
Now I’ll do this mount–the second one–in exactly the same positions and, remember, I’ve got this little lever here toward the outside on this one and toward the outside on this other one so I’m just going to use the same set of screws. I don’t need a washer really on this bottom one the hole is just just slightly larger than this machine screw but on that top one I’m going to use one of these washers because it’s into one of those larger slots.
If it’s in one of those larger slots too, just want to make sure this is pretty even, parallel to each other. All right, so I’m going to just tighten these down and now those tv brackets are mounted to the back of this 50 inch tv.
Okay, I’ve grabbed this lift bracket that I’m going to mount into the appropriate hole based on that measurement we had talked about, and this lift bracket comes with a couple of machine screws with a hex head pre-installed. I’ve just backed both those out and so now I’m just going to go ahead and put this one into the hole that’s going to be appropriate for the measurement on that tv mounting bracket to the top of the tv. All right, I’ve got that mounted and I’m going to mount the tv there.
Okay, now we’re going to test the tv in those positions. I’ve got a helper here, I’m just going to kind of hold that over there and he’s just going to latch the top of this bar, the flat part of this bar is going to just slip right down into that groove. This is going to hang on that now there will be two of them all in the end but right now we’re just testing, so we’ll just want to make sure that the tv goes down all the way and that the lid closes.
Okay, so the tv clears and the lid fully closes! Okay, now we’re going to raise the tv and go ahead and put on the second lift bracket on the mechanism. Okay now I’m adding the second lift bracket and it’s four holes down from this or the fourth hole down. So, one, two, three, fourth hole. And that’s where I’m going to put the second lift bracket which will then line up with the tv bracket. So I’m just going to put those on and tighten that up and I’m going to get my assistant and we’re going to set them onto these brackets.
Okay, now with the tv mounted, I’m just going to go ahead and rotate these little arms up they kind of clamp onto that bar and then and then the last thing to do will just be to plug the tv into the power strip inside the footboard and then turn the tv on and we’re done!
We hope that this video has helped in the setup and installation of the tv lift bed and if you have any questions just give us a call at the number at the bottom of the screen. ((801) 980-7759)
–END OF TRANSCRIPT–