How to send out a mass email campaign in Salesforce with MassMailer
Photo from Unsplash
Originally Posted On: https://massmailer.io/blog/how-to-send-out-a-mass-email-campaign-with-massmailer/
With MassMailer, you can send Salesforce campaigns to leads or contacts, send mass mails instantly or schedule for later, use existing templates or campaigns to build new ones and review stats like bounces, opens, clicks and many more. Additionally, MassMailer helps you send mass mail campaigns without hitting any Salesforce email limitations.
Here’s how you can send mass email campaign using MassMailer:
Step 1: Create your Campaign
On the Salesforce campaign tab, click New to create a new campaign. It will take you to the Campaign Edit page. Fill in campaign details like Type, Status, Name, Description, etc.
Step 2: Set up Campaign Analytics
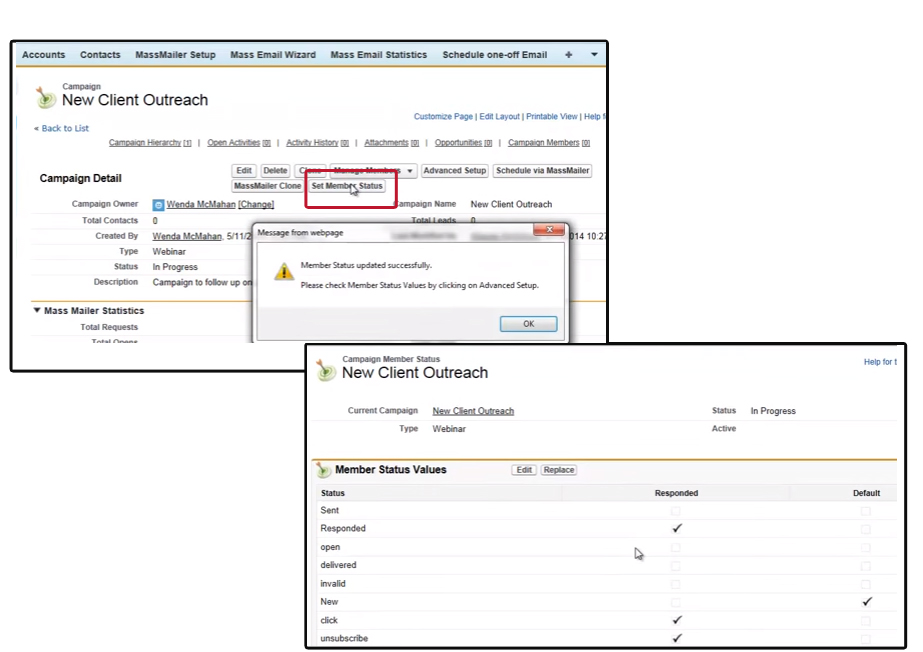
In the Campaign page, click on Set Member Status. This will add the possible MassMailer status values to the campaign like Open, Delivered, Invalid, Click, Bounce Rate, Unsubscribe, etc. in the campaign statistics. A dialog box confirms the addition of the status values.
From the Advance Set up tab, you can view existing MassMailer statuses. Here you can also decide which Statuses will count as Responded.
Step 3: Add/Delete/Edit Members
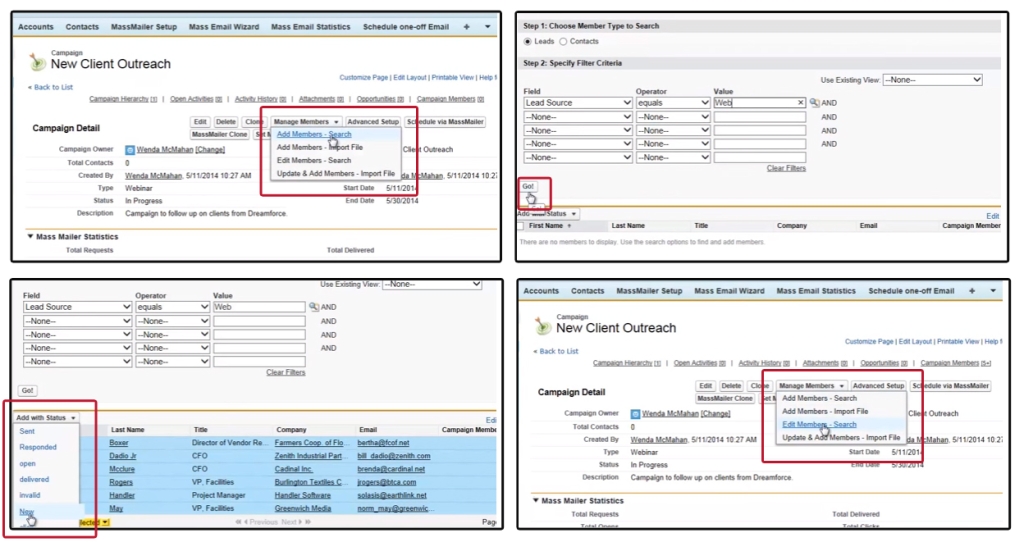
To add new members to your campaign, click on the Manage Members tab. The drop down will give you options on how you want to add the members. To add members who are already in your Salesforce database, click on Add Members-Search.
You can choose member type to search (leads or contacts) and add additional filter criteria if you want. Clicking on Go will list out members that match the criteria. Use the check box to select the desired member.
Once new members are selected, click on Add with Status and select New from the drop down menu to assign the leads when they are first added to your campaign.
To view members of the campaign, you can click on Manage Members > Edit Members – Search. You can add, delete, edit and update member statuses from here. Using the filters, you can narrow down your member search.
Step 4: Send & Track your Campaign
![]()
To send your campaign, click on the Schedule via MassMailer tab.
On this page, you can set your Schedule Name, Bcc Options, Sender Options and select a Template for the campaign. You can edit an existing template or send a mass mail with a subject and body copy without using a template.
Choose to Send Now or Schedule Later. You can even send a test email to your logged in Id from here.
You can find the analytics of your campaign on the Campaign Detail page with metrics like Opens, Bounces, Delivered, etc.
For more details on how to send a mass email using MassMailer, check out the video below:
MassMailer is simple, easy to use wizard that extends the capabilities and limits of Salesforce’s mass mailing functions. With MassMailer’s Salesforce friendly interface, you can send more than 250 emails at a time. It enables you to send emails to your campaign members, leads and contacts all together from within Salesforce, thus, saving your time and effort.